Getting started with Seedance 2.5 in Kaiber Canvas
A quick guide to using Seedance 2.5 in Kaiber. How to access, set up your flow and prompt for best results.
Written By Kaiber Support
Last updated 2 months ago

Seedance 2.5 is ByteDance's latest video model, now available in Canvas. It generates clips up to 30 seconds long and gives you much stronger control over references, so you can guide a generation with your own images, video, and audio instead of relying on text alone.
Access Seedance 2.5
The Seedance models live inside the Create Video Flow.
Add a Create Video Flow to your Canvas.
Choose Seedance from the video model menu.
Open Advanced Features at the bottom of the flow.
Switch the Seedance Model from 2.0 to 2.5.
The two modes
Generate mode is text to video, or you can animate from a start keyframe with an optional end keyframe. This is the fastest way in if you don't have reference material yet, just describe what you want to see.
Reference mode lets you bring in your own image, video, and audio references to guide the generation. Use this when you want to control likeness, style, or a specific look rather than leaving it to the prompt alone.
Images: up to 9, 30 MB per file
Video: up to 3 clips, 15 seconds total, 50 MB
Audio: up to 3 clips, 15 seconds total, 15 MB per file
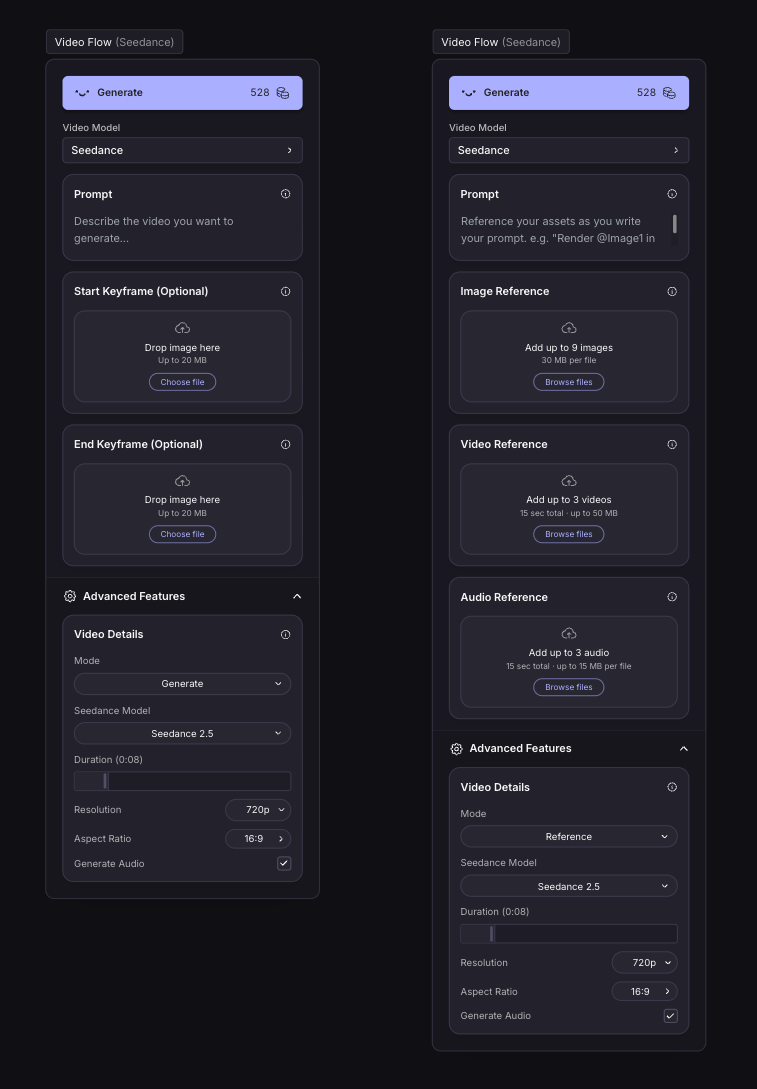
Settings
Duration: 4 to 30 seconds
Resolution: 480p, 720p, or 1080p
Generate Audio: toggle on or off
Writing your prompt
One of Seedance 2.5's biggest strengths is holding a longer take together, but that only works if your prompt gives it a timeline to follow.
For anything over about 10 seconds, break the action into timestamped beats rather than one flat description. Establish who or what you're describing before the timeline starts, don't open cold on "she" or "it" with nothing for the model to attach it to. If you're using a reference image, name it first:
Reference @Image1 for the woman at the table. 0-8s: she sits at the table, turning the letter over once. 8-18s: she opens it, her expression shifts from guarded to relieved. 18-30s: she sets it down and looks out the window.
Without a reference or starting image use a description instead:
A woman in her 30s with blond hair and blue eyes wearing a threadbare green sweater and blue jeans sits at a kitchen table in early morning light. 0-8s: she stares at an unopened letter, turning it over once. 8-18s: she opens it, her expression shifts from guarded to relieved. 18-30s: she sets it down and looks out the window.
Without that setup, the model fills the gap itself and the shot tends to drift.
Reference @Image1 for the character. A dramatic scene, she scrambles up a rockface as clouds move across the sky and a waterfall pours into a pond below, water rippling and splashing.
0-2s: camera orbits around her as she climbs.
2-4s: tracking shot follows her up the rockface, the waterfall and pond visible beside her.
4-6s: extreme close-up on her gripping hand, then her face, tense with effort.
Using image, video and audio references
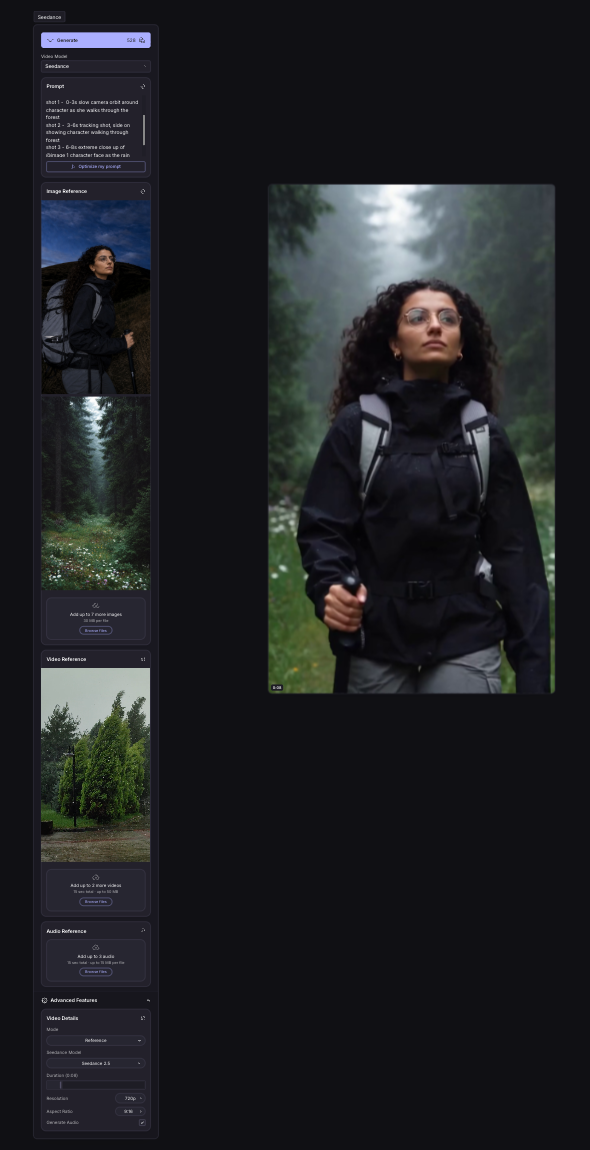
When working in reference mode, label each reference in the prompt. For example "reference @Image1 for the jacket, @Image2 for the location." Unlabeled references are one of the most common reasons a generation doesn't match what you expected.
Image references guide the appearance of characters, products, environment, lighting, clothing, or anything else that needs a visual reference. Label each image in the prompt and clearly state what it shows.
@Image1 controls only the product's shape, color, and label design. Place the product on a dark reflective surface.
For a character, a character sheet showing the character clearly labeled from a few angles, with close ups of any details, works best and holds identity better than a single flat headshot. If you are uploading multiple images of a single character, group them under one label so the model reads them as the same person rather than several different people. When using references of more than one character, keep each person's images clearly separated.
@Image1-3 are the same woman from front, three-quarter, and profile angles. Use them to lock her face and hair only. Do not carry over the studio backdrop from those photos.
Video references are best used to add motion. Say what each video should control: the camera movement, the pacing, or the movement of a character or the environment.
@Video1 controls only the camera movement and pacing. @video2 controls the movement of the robot delivery character in @image1.
Audio references can be used to sync character movement to a beat, or to land cuts on a beat. A track can also set mood, shaping the atmosphere, lighting, or pace of a scene rather than driving specific hits. A slow, tense track can make a scene feel like it's building even with no cuts timed to it at all.
Reference @Audio1 for atmosphere only, a low tense hum building slowly. Let the lighting dim and her movement slow as the tension in the track builds.
Use your reference media with intention. Consistency starts slipping once a scene goes much past seven or eight people or references in one generation, faces, lighting, and camera style all competing tend to make the result less predictable, not more. More references help most when each one is doing a clear, single job.
Adding dialogue
First, make sure Generate Audio is toggled on in the advanced settings.
Put spoken lines in quotation marks so the model reads them as speech rather than description, and keep each line to one sentence. Long or multi-sentence quotes are where lip sync and audio quality tend to fall apart.
With more than one character, say explicitly who's speaking and what everyone else is doing while they're not. Without that, the model can have both characters talk at once or blend their actions together. If you're using reference images for each character, name which reference is which before dialogue starts, the same labeling rule as above, so the model knows which face belongs to which voice.
Give dialogue its own timestamp block rather than stacking it on top of physical action in the same beat:
0-4s: reference @Image1 for the woman, @Image2 for the man. She looks up and says, "You're early." He stays silent, setting down his bag. 4-8s: he replies, "Traffic was light." She smiles and turns back to the stove.
Pairing a camera cut with each speaker change helps reinforce who's talking, for example "cut to a close-up of him as he replies."
What people are making with Seedance 2.5
Product videos. Brand and e-commerce teams feed in packaging, angle, and lifestyle shots as references, then structure the 30 seconds as a reveal, in some flavor of macro detail, side-by-side use, then a clean hero shot. The references keep the product recognizable through the whole take instead of the model reinventing it shot to shot.
Multi-character scenes. Short dialogue-driven beats between two or three characters, using labeled reference images to hold each person consistent across a single continuous take rather than having faces drift between cuts.
Music-synced content. Dropping in a track as an audio reference so the camera move and any cuts land on the beat, useful for trailers or anything sound-led like a chase or a product moment that needs to hit on a specific note.
Motion transfer. Referencing an existing video purely for its camera movement and pacing, then describing a completely different subject to swap in, so you can use camera work without the footage.
Previs. Blocking out a shot before committing to a full production. A 30-second take with references is fast enough to test whether a concept holds up before shooting or animating it properly.
Was this helpful?
Still need help? Ask the team